Bake Impressive Cinnamon Twist Bread: Easier Than It Looks
There's an undeniable magic to fresh, homemade bread. The aroma alone is enough to transport you to a place of comfort and warmth, beckoning everyone in the house to the kitchen. Among the vast array of breads, the cinnamon twist bread holds a special place. It’s a beautiful, artisanal loaf that boasts the irresistible flavors of a classic cinnamon roll, but in a more elegant, sliceable format. Many home bakers might eye its intricate swirl and assume it’s a project best left to professionals, but we're here to tell you a delightful secret: baking impressive cinnamon twist bread is much easier than it looks! This recipe is a true testament to how simple ingredients, combined with a little patience and passion, can transform into an extraordinary culinary creation. Imagine soft, pillowy layers of sweet dough, generously filled with a caramelized brown sugar and cinnamon mixture, all artfully twisted together. Each slice reveals a complex symphony of sweetness and spice, making it a perfect centerpiece for breakfast, brunch, or an afternoon treat. Get ready to fill your kitchen with an aroma that’s nothing short of heavenly.The Irresistible Allure of Cinnamon Twist Bread
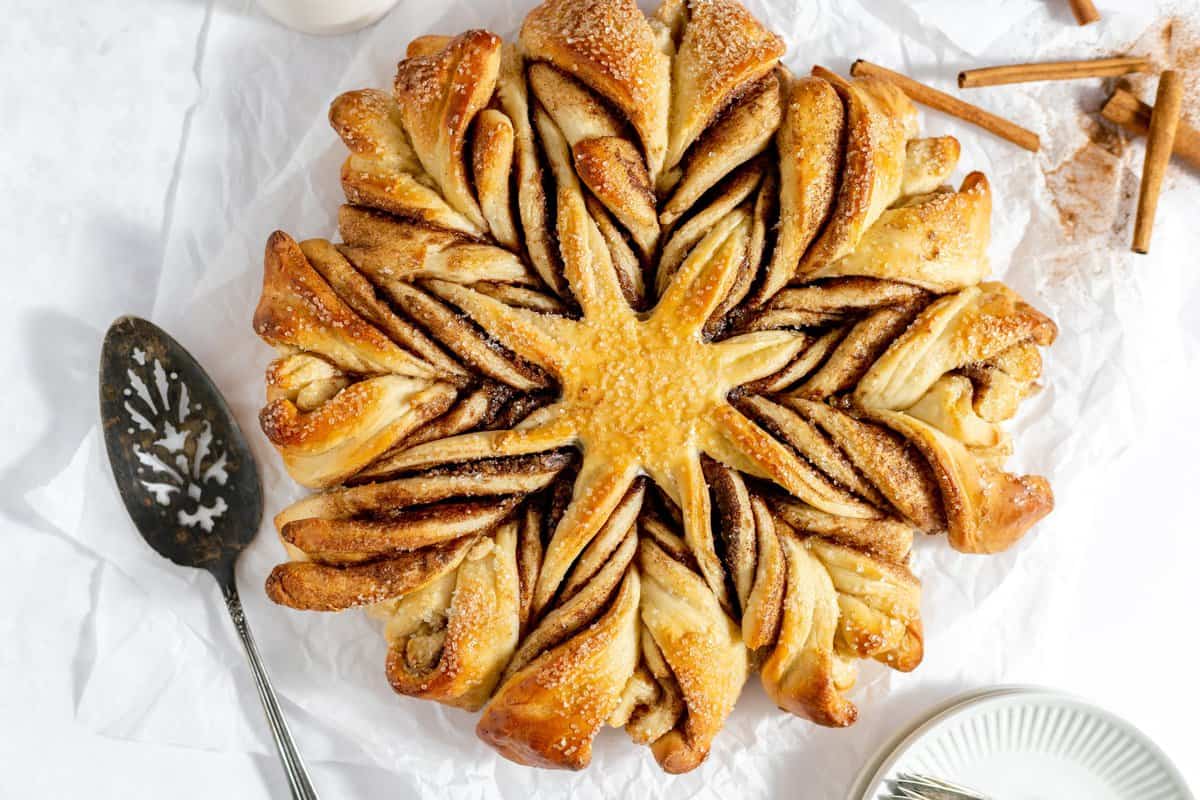
What is it about twist bread that makes it so utterly captivating? It’s a multi-sensory experience that begins long before the first bite. The visual appeal of the swirled layers is immediate, promising depths of flavor. Then comes the scent – a warm, inviting blend of cinnamon, brown sugar, and freshly baked dough that permeates every corner of your home. Finally, the taste and texture deliver on every promise: * Soft, Pillowy Texture: The dough is designed to be incredibly tender and airy, almost melting in your mouth. This is achieved through careful kneading and proper proofing, allowing the yeast to develop its full potential. * Rich, Aromatic Filling: Unlike a plain sweet bread, the cinnamon twist bread features a luscious filling made from brown sugar, ground cinnamon, and often a touch of melted butter. This mixture caramelizes slightly during baking, creating pockets of intense, spiced sweetness within the bread. * A Twist on a Classic: Think of it as the sophisticated cousin to the cinnamon roll. While it delivers all the beloved flavors, its loaf form makes it incredibly versatile. It's easier to slice, toast, and serve, making it an excellent candidate for everything from a simple breakfast with a pat of butter to a decadent French toast. In fact, if you're looking for the ultimate treat, we highly recommend trying this Soft & Pillowy Cinnamon Twist Bread: Perfect for French Toast. * Impressive Presentation, Simple Execution: The "twist" technique, while looking complex, is surprisingly straightforward. It allows you to showcase the beautiful layers of dough and filling, elevating a humble loaf into a show-stopping creation that will surely impress family and guests. This bread isn't just food; it's an expression of comfort, a food love language passed down through generations. As one homemaker lovingly shared, "You’ve got to have a fresh slice of bread every single time you make it. WITH butter." This sentiment perfectly encapsulates the simple joy this bread brings.Gathering Your Essentials: Ingredients and Tools for Success
One of the most reassuring aspects of baking cinnamon twist bread is that it relies on basic pantry staples. You won't need to hunt for exotic ingredients; everything you need can be found at your local grocery store.Key Ingredients:
- All-Purpose Flour: The backbone of your dough. Ensure it's fresh for the best results.
- Active Dry Yeast: The leavening agent that gives your bread its rise and soft texture. Make sure it's not expired!
- Milk: Provides moisture and helps create a tender crumb. Whole milk is often preferred for richness.
- Granulated Sugar: Sweetens the dough and feeds the yeast.
- Butter: Adds richness to both the dough and the filling, contributing to its melt-in-your-mouth quality.
- Eggs: Enrich the dough, adding structure and tenderness.
- Salt: Balances the sweetness and enhances the overall flavor.
- Brown Sugar & Ground Cinnamon: The stars of your delectable filling. Dark brown sugar will give a deeper, more molasses-like flavor, while light brown sugar offers a milder sweetness.
- Optional Glaze Ingredients: Powdered sugar, milk, and vanilla extract for a simple finishing touch.
Essential Tools:
- Large Mixing Bowl: Crucial for mixing and allowing your dough to rise.
- Measuring Cups & Spoons: For accurate ingredient ratios.
- Rolling Pin: To roll out your dough into an even rectangle.
- Rubber Spatula or Offset Spatula: For spreading the filling evenly.
- Sharp Knife or Bench Scraper: For slicing the dough log.
- Loaf Pan (8.5x4.5 or 9x5 inches): The standard vessel for baking your twist bread.
- Parchment Paper: Highly recommended to line your loaf pan, making removal effortless and cleanup a breeze.
- Wire Rack: For cooling the bread completely.
And here's a liberating thought: you do not need a fancy stand mixer to make this bread! While a mixer with a dough hook can certainly make the kneading process quicker, this recipe can absolutely be made by hand. A large mixing bowl, a sturdy spoon, and a little bit of muscle are all you need to achieve a beautifully elastic dough. There’s a particular satisfaction that comes from kneading dough by hand, feeling it transform from a shaggy mass into a smooth, pliable ball.
The Art of the Twist: Step-by-Step Shaping for a Stunning Loaf
The "twist" is where the magic truly happens, transforming a simple filled dough into an impressive, swirled masterpiece. Here's a breakdown of the process, ensuring you achieve those beautiful layers:1. Preparing the Dough:
Begin by activating your yeast in warm milk (around 105-115°F or 40-46°C) with a pinch of sugar. Once foamy, combine it with the remaining dough ingredients (flour, sugar, butter, eggs, salt) in your mixing bowl. Knead the dough until it's smooth, elastic, and passes the "windowpane test" – where a small piece of dough can be stretched thin enough to see light through it without tearing. This indicates proper gluten development. Place the dough in a lightly oiled bowl, cover, and let it rise in a warm place until doubled in size, typically 1-1.5 hours.
2. Crafting the Flavorful Filling:
While the dough is rising, prepare your filling. Simply combine brown sugar, ground cinnamon, and a few tablespoons of melted butter in a small bowl. Mix until it forms a thick paste. The butter helps the filling adhere to the dough and contributes to the caramelized texture.
3. Rolling and Filling:
Once your dough has risen, gently deflate it and turn it out onto a lightly floured surface. Using a rolling pin, roll the dough into a large rectangle, approximately 12x18 inches (30x45 cm) and about 1/4 inch thick. Aim for an even thickness to ensure uniform baking. Generously spread the cinnamon-sugar filling over the entire surface of the rectangle, leaving a small border (about 1/2 inch) along one of the longer edges to help seal the log.
4. The Crucial Twist Technique:
- Roll into a Log: Starting from the longer edge opposite the border, carefully roll the dough tightly into a log, just like you would for cinnamon rolls. Pinch the seam closed to seal the filling inside.
- Slice the Log: Using a very sharp knife or bench scraper, carefully slice the dough log lengthwise right down the middle, exposing the beautiful layers of dough and filling. You'll now have two long halves with the swirled filling visible.
- Form the Twist: Gently lay one half of the dough over the other, crossing them to form an "X" shape. Then, carefully twist the two halves together, keeping the cut sides facing upwards as much as possible to showcase the filling. You can form a simple two-strand braid or just loosely twist them. Don't over-twist; keep it somewhat relaxed to allow room for the bread to rise in the pan.
- Place in Pan: Carefully transfer your twisted dough into your prepared loaf pan. If your twist is longer than the pan, you can gently fold the ends to fit.
5. Final Rise and Bake:
Cover the loaf pan loosely and let the twisted dough rise again in a warm spot for another 30-45 minutes, or until it has noticeably puffed up and almost reached the top of the pan. Preheat your oven to around 350°F (175°C). Bake for 30-40 minutes, or until the top is golden brown and a skewer inserted into the center comes out clean. If the top starts to brown too quickly, you can loosely tent it with aluminum foil.
